> ## Documentation Index
> Fetch the complete documentation index at: https://docs.apiyi.com/llms.txt
> Use this file to discover all available pages before exploring further.
# CLI Interactive Setup
> Use the openclaw onboard wizard and CLI commands to quickly configure OpenClaw
## Setup Wizard (Recommended for New Users)
For first-time use, run the setup wizard to complete all configuration:
```bash theme={null}
openclaw onboard
```
### Step 1: Select Model Provider
In the **Model/auth provider** list, scroll to the bottom and select:
```text theme={null}
Custom Provider (Any OpenAI or Anthropic compatible endpoint)
```
### Step 2: Enter API Base URL
In the **API Base URL** field, enter the APIYI endpoint:
```text theme={null}
https://api.apiyi.com
```
### Step 3: Choose API Key Input Method
When asked how to provide the API key, select:
```text theme={null}
Paste API key now
```
### Step 4: Paste API Key
Paste your APIYI token (also called API key, starting with `sk-`) into the input field.
How to get your token:
1. Open the APIYI Token Management page: `https://api.apiyi.com/token`
2. Find the default token with type **Pay-per-use Priority**
3. On the far right of that token's row, under the "Actions" column, click the **first copy button**
4. This copies the `sk-` prefixed token (API key) — paste it here
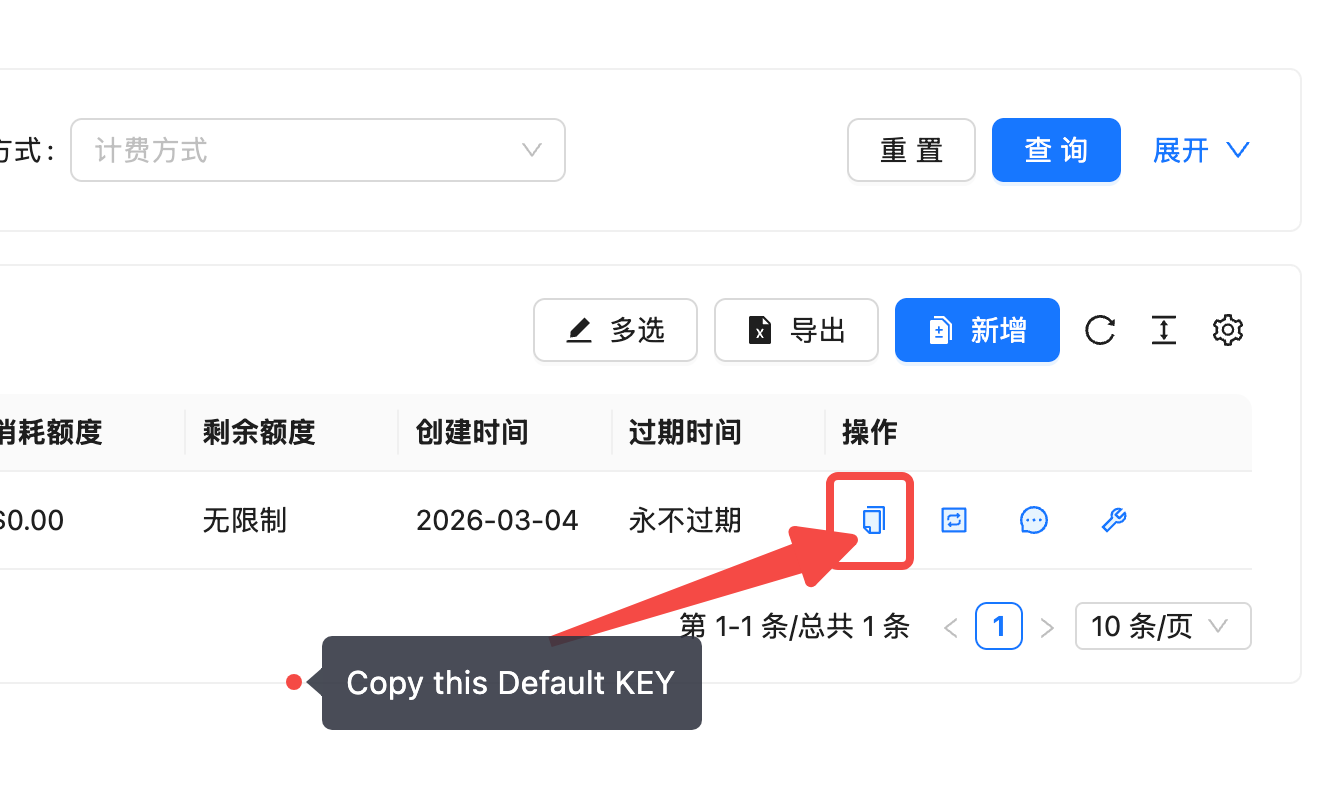 No need to create a new token — just use the default "Pay-per-use Priority" token generated by the system.
### Step 5: Select Endpoint Compatibility
In the **Endpoint compatibility** option, select:
```text theme={null}
OpenAI-compatible (Uses /chat/completions)
```
If you primarily use Claude models and need native features like Prompt Caching, you can select `Anthropic-compatible` instead. See [Anthropic Native Configuration](/en/scenarios/agent/openclaw/config-anthropic) for details.
### Step 6: Set Model ID
In the **Model ID** field, enter the model name you want to use, for example:
```text theme={null}
gpt-5.4
```
Other options: `claude-sonnet-4-6`, `deepseek-v3.2`, `gemini-3.1-pro-preview`, etc.
### Step 7: Verify and Complete
OpenClaw will automatically verify the configuration. Upon success, the system generates an **Endpoint ID** (e.g., `custom-api-apiyi-com`), indicating the setup is complete.
The verification process may occasionally return errors — retrying usually succeeds. If it keeps failing, check that your API key is correct and your network connection is stable.
### Configuration Summary
| Parameter | Value |
| ------------- | --------------------------------------- |
| Provider | Custom Provider |
| API Base URL | `https://api.apiyi.com` |
| Compatibility | OpenAI-compatible |
| Endpoint ID | `custom-api-apiyi-com` (auto-generated) |
## Modify Configuration
After initial setup, use the `configure` command to re-enter interactive configuration:
```bash theme={null}
openclaw configure
```
This opens an interactive configuration menu for:
* Model providers and default model
* Chat channel settings
* Skill enable/disable
* Gateway parameters
## Single Config Commands
Quickly view or modify individual config items:
```bash theme={null}
{/* View current config value */}
openclaw config get agents.defaults.model.primary
{/* Set config value */}
openclaw config set agents.defaults.model.primary "apiyi/gpt-5.4"
{/* Set API key */}
openclaw config set models.providers.apiyi.apiKey "sk-your-key"
```
## Web UI Config Panel
After starting the Dashboard, you can also manage configuration in the browser:
```bash theme={null}
openclaw dashboard
```
Open `http://127.0.0.1:18789/` to access the settings page where you can:
* Visually edit model configuration
* Manage chat channel connections
* View and toggle configured skills
* Monitor logs and running status in real-time
## Start the Service
After configuration, start the Gateway:
```bash theme={null}
openclaw gateway start
```
After configuration changes, restart the service:
```bash theme={null}
openclaw gateway restart
```
No need to create a new token — just use the default "Pay-per-use Priority" token generated by the system.
### Step 5: Select Endpoint Compatibility
In the **Endpoint compatibility** option, select:
```text theme={null}
OpenAI-compatible (Uses /chat/completions)
```
If you primarily use Claude models and need native features like Prompt Caching, you can select `Anthropic-compatible` instead. See [Anthropic Native Configuration](/en/scenarios/agent/openclaw/config-anthropic) for details.
### Step 6: Set Model ID
In the **Model ID** field, enter the model name you want to use, for example:
```text theme={null}
gpt-5.4
```
Other options: `claude-sonnet-4-6`, `deepseek-v3.2`, `gemini-3.1-pro-preview`, etc.
### Step 7: Verify and Complete
OpenClaw will automatically verify the configuration. Upon success, the system generates an **Endpoint ID** (e.g., `custom-api-apiyi-com`), indicating the setup is complete.
The verification process may occasionally return errors — retrying usually succeeds. If it keeps failing, check that your API key is correct and your network connection is stable.
### Configuration Summary
| Parameter | Value |
| ------------- | --------------------------------------- |
| Provider | Custom Provider |
| API Base URL | `https://api.apiyi.com` |
| Compatibility | OpenAI-compatible |
| Endpoint ID | `custom-api-apiyi-com` (auto-generated) |
## Modify Configuration
After initial setup, use the `configure` command to re-enter interactive configuration:
```bash theme={null}
openclaw configure
```
This opens an interactive configuration menu for:
* Model providers and default model
* Chat channel settings
* Skill enable/disable
* Gateway parameters
## Single Config Commands
Quickly view or modify individual config items:
```bash theme={null}
{/* View current config value */}
openclaw config get agents.defaults.model.primary
{/* Set config value */}
openclaw config set agents.defaults.model.primary "apiyi/gpt-5.4"
{/* Set API key */}
openclaw config set models.providers.apiyi.apiKey "sk-your-key"
```
## Web UI Config Panel
After starting the Dashboard, you can also manage configuration in the browser:
```bash theme={null}
openclaw dashboard
```
Open `http://127.0.0.1:18789/` to access the settings page where you can:
* Visually edit model configuration
* Manage chat channel connections
* View and toggle configured skills
* Monitor logs and running status in real-time
## Start the Service
After configuration, start the Gateway:
```bash theme={null}
openclaw gateway start
```
After configuration changes, restart the service:
```bash theme={null}
openclaw gateway restart
```