> ## Documentation Index
> Fetch the complete documentation index at: https://docs.apiyi.com/llms.txt
> Use this file to discover all available pages before exploring further.
# CLI 交互式配置
> 使用 openclaw onboard 向导和 CLI 命令快速配置 OpenClaw
## 安装向导(推荐新用户)
首次使用 OpenClaw,运行安装向导完成所有配置:
```bash theme={null}
openclaw onboard
```
### 步骤一:选择模型提供商
在 **Model/auth provider** 列表中,滚动到底部,选择:
```text theme={null}
Custom Provider (Any OpenAI or Anthropic compatible endpoint)
```
### 步骤二:填写 API 地址
在 **API Base URL** 字段中输入 API易 的接口地址:
```text theme={null}
https://api.apiyi.com
```
### 步骤三:选择密钥输入方式
系统会询问 API 密钥的提供方式,选择:
```text theme={null}
Paste API key now
```
### 步骤四:粘贴 API 密钥
在密钥输入框中,粘贴你的 API易 令牌(即密钥,`sk-` 开头)。
获取方式:
1. 打开 API易 令牌管理页面:`https://api.apiyi.com/token`
2. 找到类型为**按量优先**的默认令牌
3. 在该令牌所在行最右侧的「操作」栏,点击**第一个复制按钮**
4. 即可复制出 `sk-` 开头的令牌(密钥),粘贴到此处即可
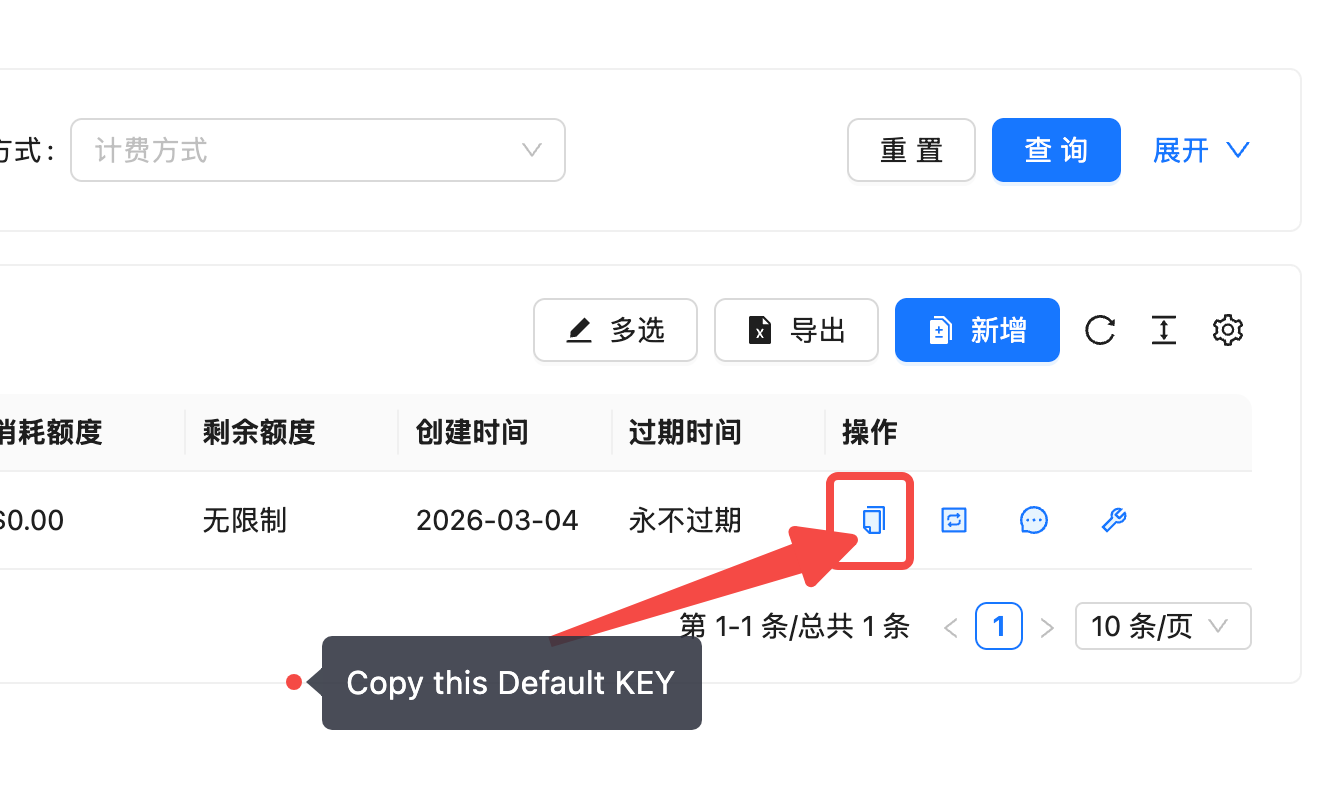 无需新建令牌,直接使用系统默认生成的「按量优先」令牌即可。
### 步骤五:选择端点兼容模式
在 **Endpoint compatibility** 选项中,选择:
```text theme={null}
OpenAI-compatible (Uses /chat/completions)
```
如果你主要使用 Claude 模型并需要 Prompt Caching 等原生特性,可以选择 `Anthropic-compatible`。详见 [Anthropic 原生配置](/scenarios/agent/openclaw/config-anthropic)。
### 步骤六:设置模型 ID
在 **Model ID** 字段中输入你要使用的模型名称,例如:
```text theme={null}
gpt-4o
```
建议初始配置时先使用 `gpt-4o` 等常见模型完成验证,跑通后再在 OpenClaw 中切换为你实际需要的模型(如 `gpt-5.4`)。部分老版本 OpenClaw 在初始化阶段可能无法识别较新的模型名称,导致 503 错误。每次修改完模型配置后,记得重启 OpenClaw 使配置生效,也可以在对话中让 OpenClaw 自行重启。
其他可选模型:`claude-sonnet-4-6`、`deepseek-v3.2`、`gemini-3.1-pro-preview` 等。
### 步骤七:验证并完成
OpenClaw 会自动验证配置。验证成功后,系统会生成一个 **Endpoint ID**(如 `custom-api-apiyi-com`),表示配置完成。
验证过程偶尔可能返回错误,重试通常即可成功。如果持续失败,请检查 API 密钥是否正确、网络是否通畅。
### 配置完成后的参数
| 参数 | 值 |
| ------------- | ---------------------------- |
| Provider | Custom Provider |
| API Base URL | `https://api.apiyi.com` |
| Compatibility | OpenAI-compatible |
| Endpoint ID | `custom-api-apiyi-com`(自动生成) |
## 修改配置
已完成初始配置后,使用 `configure` 命令重新进入交互式配置:
```bash theme={null}
openclaw configure
```
这会打开交互式配置菜单,可以修改:
* 模型提供商和默认模型
* 聊天渠道设置
* 技能启用/禁用
* Gateway 参数
## 单项配置命令
快速查看或修改单个配置项:
```bash theme={null}
{/* 查看当前配置值 */}
openclaw config get agents.defaults.model.primary
{/* 设置配置值 */}
openclaw config set agents.defaults.model.primary "apiyi/gpt-5.4"
{/* 设置 API 密钥 */}
openclaw config set models.providers.apiyi.apiKey "sk-你的密钥"
```
## Web UI 配置面板
启动 Dashboard 后,也可以在浏览器中管理配置:
```bash theme={null}
openclaw dashboard
```
打开 `http://127.0.0.1:18789/`,在设置页面可以:
* 可视化编辑模型配置
* 管理聊天渠道连接
* 查看和切换已配置的技能
* 实时查看日志和运行状态
## 启动服务
配置完成后启动 Gateway:
```bash theme={null}
openclaw gateway start
```
配置更改后需要重启服务:
```bash theme={null}
openclaw gateway restart
```
无需新建令牌,直接使用系统默认生成的「按量优先」令牌即可。
### 步骤五:选择端点兼容模式
在 **Endpoint compatibility** 选项中,选择:
```text theme={null}
OpenAI-compatible (Uses /chat/completions)
```
如果你主要使用 Claude 模型并需要 Prompt Caching 等原生特性,可以选择 `Anthropic-compatible`。详见 [Anthropic 原生配置](/scenarios/agent/openclaw/config-anthropic)。
### 步骤六:设置模型 ID
在 **Model ID** 字段中输入你要使用的模型名称,例如:
```text theme={null}
gpt-4o
```
建议初始配置时先使用 `gpt-4o` 等常见模型完成验证,跑通后再在 OpenClaw 中切换为你实际需要的模型(如 `gpt-5.4`)。部分老版本 OpenClaw 在初始化阶段可能无法识别较新的模型名称,导致 503 错误。每次修改完模型配置后,记得重启 OpenClaw 使配置生效,也可以在对话中让 OpenClaw 自行重启。
其他可选模型:`claude-sonnet-4-6`、`deepseek-v3.2`、`gemini-3.1-pro-preview` 等。
### 步骤七:验证并完成
OpenClaw 会自动验证配置。验证成功后,系统会生成一个 **Endpoint ID**(如 `custom-api-apiyi-com`),表示配置完成。
验证过程偶尔可能返回错误,重试通常即可成功。如果持续失败,请检查 API 密钥是否正确、网络是否通畅。
### 配置完成后的参数
| 参数 | 值 |
| ------------- | ---------------------------- |
| Provider | Custom Provider |
| API Base URL | `https://api.apiyi.com` |
| Compatibility | OpenAI-compatible |
| Endpoint ID | `custom-api-apiyi-com`(自动生成) |
## 修改配置
已完成初始配置后,使用 `configure` 命令重新进入交互式配置:
```bash theme={null}
openclaw configure
```
这会打开交互式配置菜单,可以修改:
* 模型提供商和默认模型
* 聊天渠道设置
* 技能启用/禁用
* Gateway 参数
## 单项配置命令
快速查看或修改单个配置项:
```bash theme={null}
{/* 查看当前配置值 */}
openclaw config get agents.defaults.model.primary
{/* 设置配置值 */}
openclaw config set agents.defaults.model.primary "apiyi/gpt-5.4"
{/* 设置 API 密钥 */}
openclaw config set models.providers.apiyi.apiKey "sk-你的密钥"
```
## Web UI 配置面板
启动 Dashboard 后,也可以在浏览器中管理配置:
```bash theme={null}
openclaw dashboard
```
打开 `http://127.0.0.1:18789/`,在设置页面可以:
* 可视化编辑模型配置
* 管理聊天渠道连接
* 查看和切换已配置的技能
* 实时查看日志和运行状态
## 启动服务
配置完成后启动 Gateway:
```bash theme={null}
openclaw gateway start
```
配置更改后需要重启服务:
```bash theme={null}
openclaw gateway restart
```